Inspection equipment details
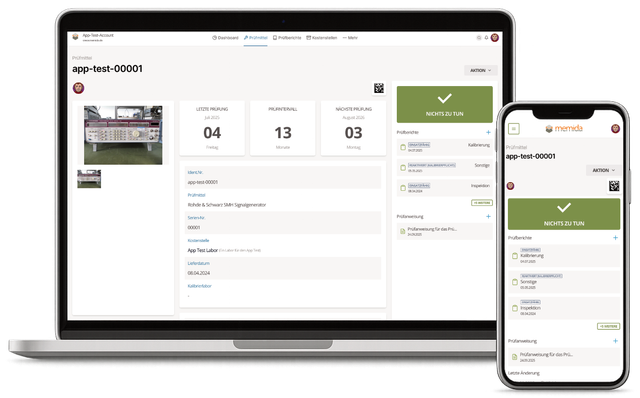
Fig. 1: Inspection equipment details
The top section displays the most important information about the device.
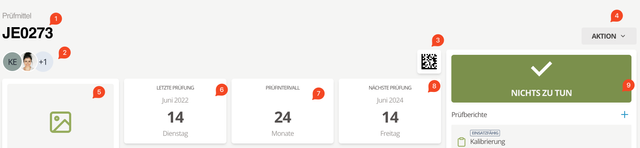
Fig. 2: Details header
- ID no. of the device
- Assigned users – these users are allowed to edit the device
- 2D code – this DataMatrix code uniquely identifies the device. Print it on the label to scan it with the Memida app and open the details instantly.
- Action button – provides shortcuts to:
- Add inspection report
- Edit device
- Download the master data sheet (PDF)
- View the device history
- Archive the device
- Image(s) of the device
- Date of the last inspection
- Inspection interval
- Next inspection date
- Device status
New Changes and History
If another user has changed the inspection equipment since you last viewed it, the New changes notice appears. Select View to open the history. The new entries remain highlighted while you stay in the detail view.
Memida marks the changes as viewed when you leave the detail view or dismiss the notice with Close. The complete history remains available afterwards. Alternatively, under Notices & activity on the dashboard, you can open individual histories or confirm all changes in the current filter scope with Mark changes as viewed.
Groups and Members
For a member, the detail view displays the Part of a group card. It contains the group's identification number and current status and links directly to the group detail view.
A group instead displays the Test equipment in group section. The inherited by the group label identifies the active member that determines the group status. With the appropriate edit permission, the action menu provides Edit group and Release group.
A group does not have its own inspection reports or inspection instructions. This evidence remains with the physical members. For further rules, including releasing and archiving a group, see Inspection equipment groups and sets.
Hotkeys
You do not always need to open the Action menu. The following keyboard shortcuts are available on this page:
- Windows
- macOS
- Linux
| Action | Hotkey |
|---|---|
| Add | Ctrl + Shift + A |
| Edit | Ctrl + Shift + E |
| History | Ctrl + Shift + H |
| Action | Hotkey |
|---|---|
| Add | ⌃⇧A |
| Edit | ⌃⇧E |
| History | ⌃⇧H |
| Action | Hotkey |
|---|---|
| Add | Ctrl + Shift + A |
| Edit | Ctrl + Shift + E |
| History | Ctrl + Shift + H |
Description | notes
Keep a complete timeline by documenting repairs and maintenance in the Description | Notes section. Entries appear in reverse chronological order, giving you a running history for each device.
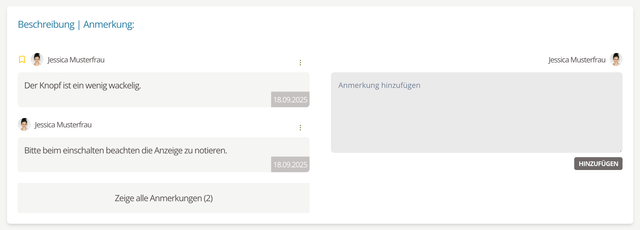
Fig. 3: Comments
Open the comment menu via the three dots  . Choose Pin (1) to pin a comment.
Tip: Pinned comments show an icon next to the avatar (2).
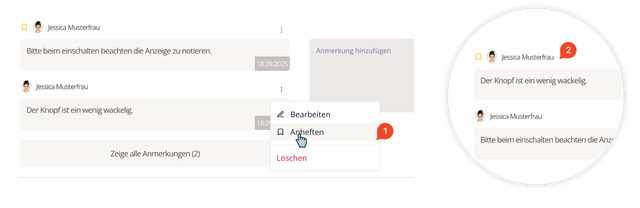
Fig. 3.1: Pinned comment
Inspection reports
Click the plus icon on the right to add a report. Click a report to open it. When more than three reports exist, Memida opens them in a compact window.
Inspection requirements
Under Inspection requirements, you will find the calibration plan and inspection instructions with their documents. The calibration plan defines the requirements for a calibration with a digital calibration certificate. Inspection instructions contain supplementary text and files.
The Calibration plan card shows whether a plan is preselected for the item or available when starting a calibration. If several plans are available, select the appropriate one at the start. A displayed recommended interval does not automatically change the item's inspection interval or next inspection date.
Use View calibration plans or Open calibration plans to go to plan management. Select Add inspection instruction to add an instruction. Open an existing entry to view its details and files. Use Load more to retrieve additional inspection instructions. The Inspection instructions guide explains how to create and edit them and how they differ from a calibration plan.
Create calibration certificates
For an individual item of inspection equipment, choose Action → Add calibration certificate. The Calibration certificate chapter explains how to record measured values, create the certificate, and seal it afterwards.
Attachments
Open the action menu and choose Edit (1), or use a hotkey to enter edit mode. Upload any supporting documents (2) by dragging files into the drop zone or clicking the center.
You can delete files (3) or assign types (4) to categorize them.
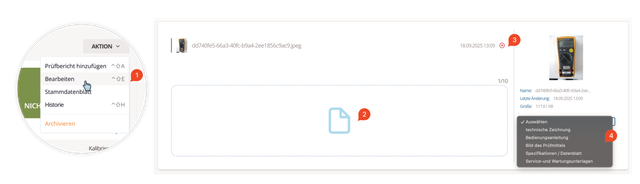
Fig. 4: Add attachments
Tip: Images tagged as Image of the inspection equipment appear in the image section at the top left.